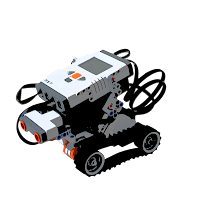
 For simplicity we assume that your robot is using a left and right hand side motors, and rotation is on the robots center axis. By this I mean the left and righ hand motors will opperate on opposite directions to obtain rotation.
First Abstraction
The first and most basic approach is to run both motors at the same time (in parallel) and rotate the motors in opposite directions by the same number of degrees as illustrated in the sequence image below. The number of degrees of motor rotation is obtained by trial and error.
Once the correct angle is found create a My Block containing the two blocks, name this new block ROTATION_v1.rbt. Watch out the NXT Software sometimes rearranges the blocks. Rearrange so that the look as shown in the image above. With these steps you have successfully abstracted rotation of the robot by 90 degrees.
Second Abstraction
Now that we have a way of rotating the robot
 by 90 degrees it would be nice to rotate it by any angle. Writing the motor rotation angle value for each motor might lead to errors or mistakes. This next step deals with preventing this error.
- For this we create a variable, we'll called it degrees.
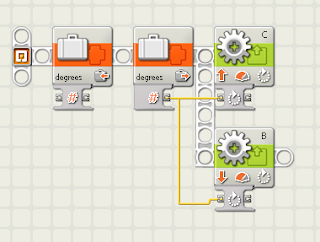
- On the sequence panel add the writing and reading blocks for this variable as shown in the image to the right.
- Connect the wires as shown so that the variable value is feed into the rotation of both motors.
- Select only motors C and B and create a new My Block. This will allow for an input into the new My Block.
- Name the new block ROTATION_V2.rbt
Third Abstraction
Lets build on the last abstraction ROTATION_v2.rbt to be able to complete the rotation abstraction.
- To do this we must first calculate the Rotation Constant. This is done by dividing the rotation angle obtained in the first abstraction (Motor Rotation angle to produce 90 degrees robot rotation) by 90. In our case this Rotation Constant would be
455/90 = 5.06
- Use a Constant block and enter the Rotation Constant just calculated.
- Use a Math block and multiply the Rotation Constant by the input number of degrees. The result will be the motor angle of rotation.
- Feed the result of the Math block to the rotation angle of each of the motors.
- Save the file as ROTATION_v3.rbt
- Test the Rotation block to make sure the rotation is correct. Adjust the Rotation Constant as necessary.
Final Abstraction
The previous abstraction will only allow right rotations. A negative number will not yield a left rotation. To deal with both left and right rotation we must identify if the input angle is either positive or negative to make the motors rotate in opposite directions.
- Use a Comparison block to find out if the number is greater than zero.
- Take the output of the Comparison block and feed it into the input of a Logical block set to NOT operation.
- The output of the Comparison block gets feed into the direction of the C motor while the output of the Logic block gets feed into the direction of motor B.
With this we complete the robot rotation abstraction.
Remember every new robot you create will require a new Rotation Constant.


cool this is great thanks
ReplyDelete